Here is a two-minute task with a measurable payoff. Browser-based AI runs on one of two paths: a CPU path that works everywhere but is slow, or a GPU path (WebGPU) that harnesses your graphics chip and finishes the same job several times faster. Many browsers ship WebGPU available but not obvious, sometimes behind a flag, sometimes simply never checked. Enabling it and confirming the tool actually switched over is the highest-return configuration change you can make.
What WebGPU is, in one paragraph
WebGPU is the browser's modern interface to graphics hardware, the successor to the older WebGL generation, redesigned for compute as well as rendering. The redesign matters for AI specifically: the older stack was built to draw triangles, and running mathematical workloads through it required contortions that capped performance. WebGPU exposes compute properly, which is why neural networks, being pure parallel arithmetic, see such disproportionate gains when it is available.
Check whether you already have it
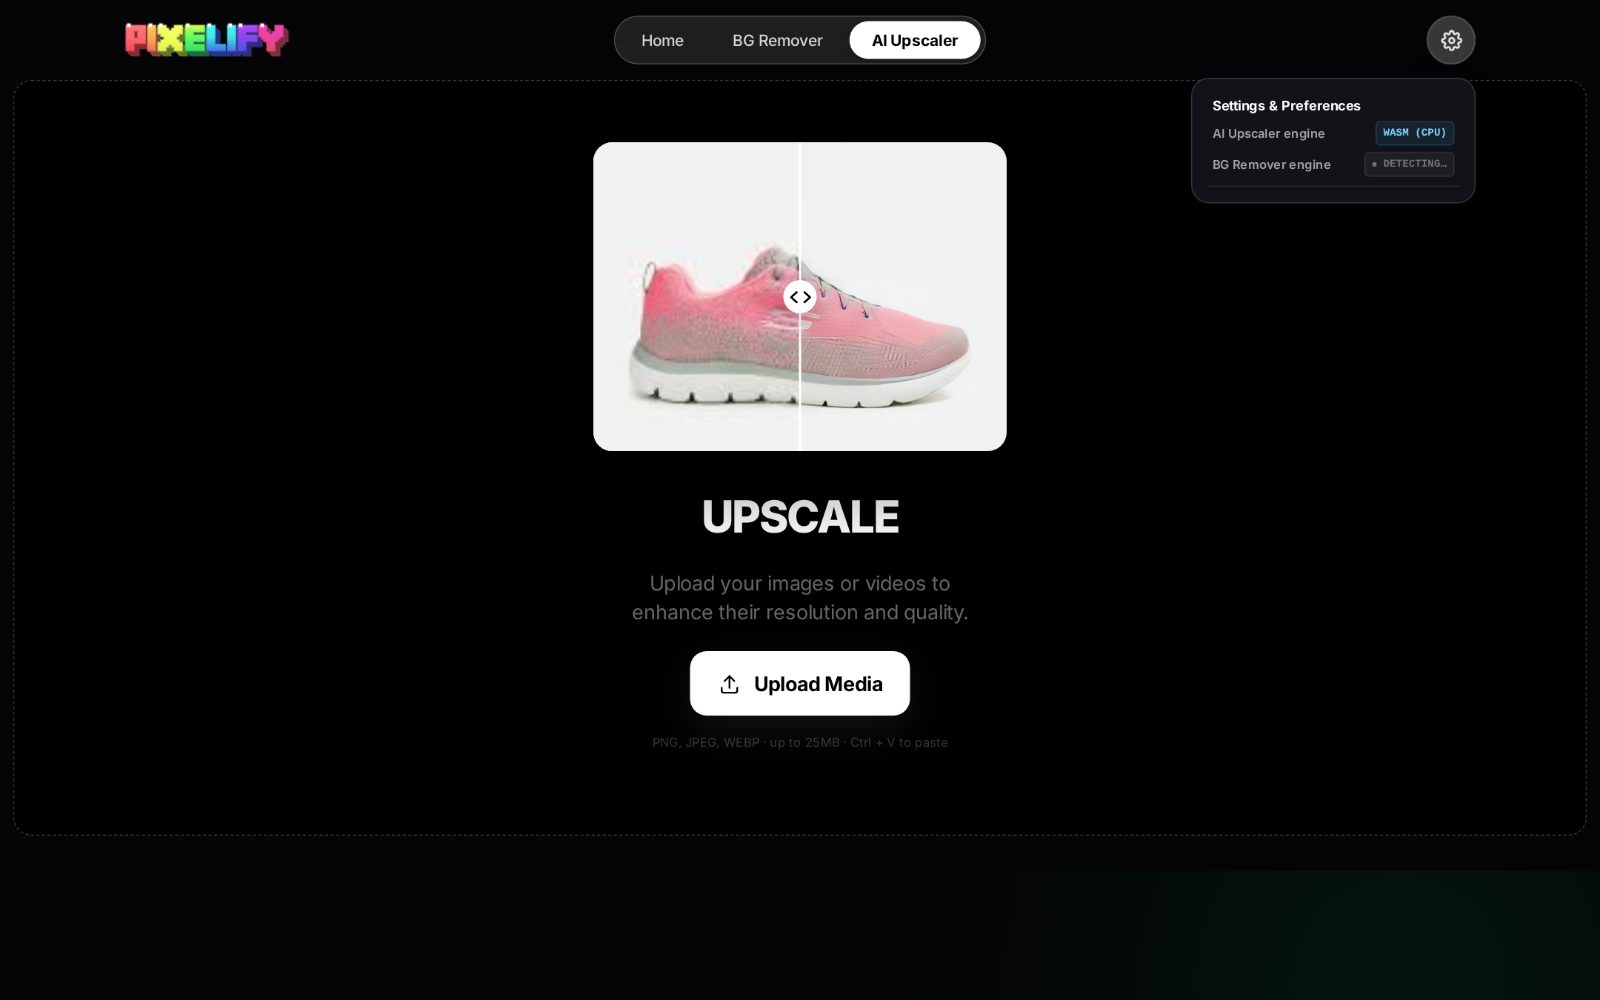
Before changing anything, the fastest path is often discovering you are already done. Open the app's settings panel (the gear icon in the top corner) and read the engine badges. If the badge reports GPU acceleration, WebGPU is active and there is nothing to configure. If it reports a CPU fallback, the sections below cover every major browser. On phones, the answer frequently depends on your operating system version rather than any setting, so updating the OS is the whole procedure.
Settings (gear icon) → engine badges. Each tool reports its own live engine, read back from the runtime rather than assumed, so the badge reflects reality, not feature detection optimism.
 Chromeand
 Microsoft Edge
If your browser is using a CPU fallback instead of GPU acceleration, enabling the appropriate WebGPU flag may help resolve the issue. Follow the steps below to check and configure WebGPU in Google Chrome or Microsoft Edge.
Step 1: Open the Browser Flags Page
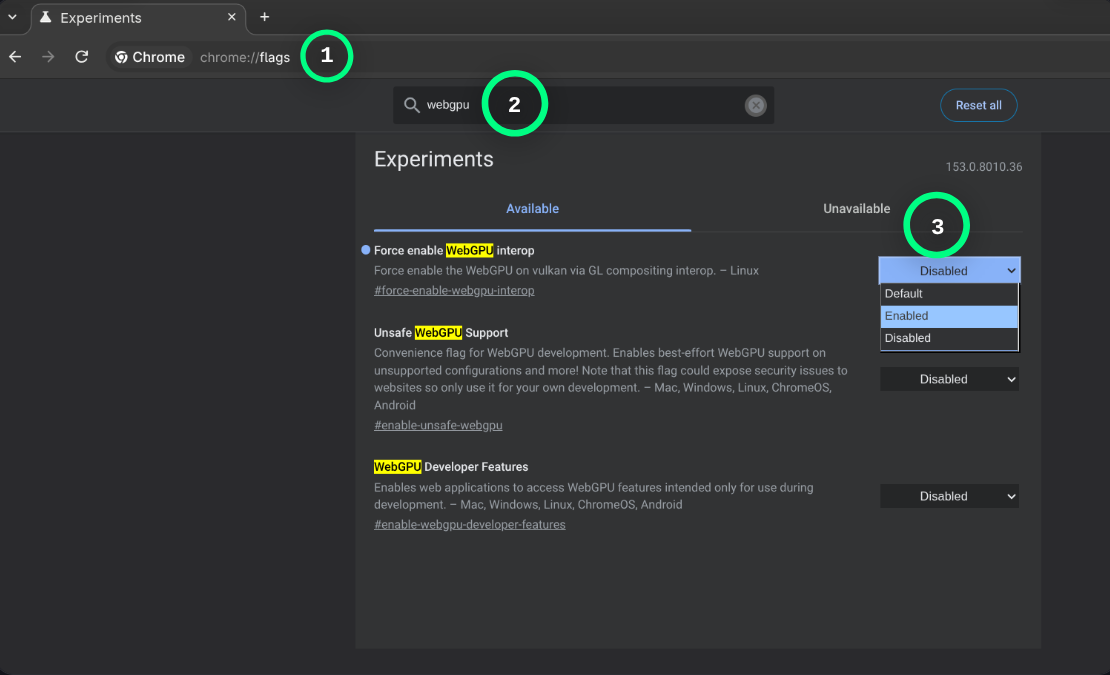
Launch Google Chrome or Microsoft Edge on your desktop. Click the address bar, type chrome://flags in Chrome or edge://flags in Microsoft Edge, and press Enter to access the experimental features page.
Step 2: Search for WebGPU
Once the Experiments page opens, locate the search box at the top. Type WebGPU to filter the available experimental settings and find the relevant WebGPU flags.
Step 3: Enable the WebGPU Flag
Find the Force enable WebGPU interop option, as shown in the screenshot. Click the dropdown menu next to it and select Enabled instead of Default.
This flag is primarily relevant to specific graphics configurations, particularly Vulkan-based configurations on Linux. If the option is unavailable or does not apply to your system, do not assume that enabling it is necessary for WebGPU to work.
Step 4: Relaunch the Browser
After changing the flag, click Relaunch if the browser displays the option. This restarts the browser and applies the updated experimental setting. Save any unfinished work before restarting.
Step 5: Verify WebGPU Functionality
After relaunching, reopen your WebGPU application and check whether the CPU fallback warning has disappeared. You can also visit chrome://gpu in Chrome or edge://gpu in Edge to inspect the browser's graphics configuration and identify potential GPU-related issues.
What If WebGPU Still Does Not Work?
If WebGPU continues to use a CPU fallback, the issue may be related to graphics driver compatibility, browser configuration, or hardware support. Update your graphics drivers, check whether your browser is using the appropriate GPU, and review the browser's GPU diagnostics for errors.
WebGPU is enabled by default on many supported desktop systems. The available flags and their effects vary by browser version and operating system, so enabling a flag does not guarantee GPU acceleration.
 Mozilla Firefox
Firefox ships WebGPU support in modern releases, enabled by default on major platforms. If your system still reports a CPU fallback, you can manually verify or enable WebGPU through Firefox's advanced configuration editor using the steps below.
Step 1: Open the Configuration Page
Launch Firefox on your desktop, type about:config into the address bar, and press Enter.
Step 2: Accept the Warning and Proceed
Firefox will prompt you with a warning that changing advanced preferences can affect performance and stability. Click "Accept the Risk and Continue" to open the configuration editor.
Step 3: Search for WebGPU Preferences
In the search preference name box at the top, type dom.webgpu.enabled to find the primary WebGPU setting.
Step 4: Toggle the WebGPU Flags to True
Double-click dom.webgpu.enabled (or click the toggle button on the right) to switch its value from false to true. If your graphics configuration requires forced acceleration (especially on Linux with Vulkan), search for gfx.webgpu.force-enabled as well and toggle it to true.
Step 5: Restart Firefox and Verify
Completely close and reopen Firefox to apply the changes. Visit about:support and check the "Graphics" section to confirm WebGPU status, or reload Pixelify and inspect the engine badge in Settings.
Firefox Troubleshooting
Firefox historically requires up-to-date Vulkan drivers on Linux/Windows and Metal on macOS. If Firefox still uses the CPU fallback, ensure your GPU drivers are updated to the latest vendor version, and verify that WebRender is operating in hardware acceleration mode under about:support.
 Brave Browser
Brave is built upon Chromium, giving it the same powerful hardware acceleration engine as Chrome. However, because Brave includes aggressive privacy shields and distinct flag defaults, WebGPU may sometimes be restricted. Follow these steps to enable WebGPU in Brave.
Step 1: Open the Brave Flags Page
Launch Brave Browser on your desktop. In the address bar, type brave://flags and press Enter to open the Experiments page.
Step 2: Search for WebGPU
In the search box at the top of the Experiments page, type WebGPU to filter for all WebGPU-related settings.
Step 3: Enable the WebGPU Flags
Locate the Force enable WebGPU interop and/or Unsafe WebGPU flags. Click the dropdown next to each applicable setting and switch it from Default to Enabled.
Step 4: Check Brave Shields Fingerprinting Protections
Brave Shields blocks fingerprinting by default, which can occasionally prevent sites from querying your GPU adapter details. If Pixelify still cannot initialize the GPU, click the Brave Lion shield icon in the URL bar for the site and ensure fingerprinting protection is not set to "Aggressive".
Step 5: Relaunch Brave and Verify
Click the Relaunch button at the bottom of the flags page to restart Brave. Once restarted, visit brave://gpu to check the WebGPU status, or return to Pixelify and check if the engine status shows GPU acceleration.
Brave Troubleshooting
If Brave still uses the CPU fallback, navigate to brave://settings/system and verify that "Use graphics acceleration when available" is turned ON. Also ensure that your operating system has assigned Brave to your high-performance discrete GPU.
 Safari on macOS
Safari enabled WebGPU starting with recent macOS and Safari versions, default-on for supported Apple Silicon and modern Intel hardware. If you need to inspect or configure WebGPU in Safari, follow the steps below.
Step 1: Enable the Develop Menu
Open Safari on macOS. In the menu bar, click Safari > Settings (or Preferences), select the Advanced tab, and check the box for "Show features for web developers" (or "Show Develop menu in menu bar").
Step 2: Open Feature Flags
Click the Develop menu in the top menu bar, and navigate to Feature Flags (or Experimental Features on older Safari versions).
Step 3: Enable WebGPU
In the search filter, type WebGPU. Locate the WebGPU entry and ensure the checkbox is checked/enabled.
Step 4: Restart Safari and Verify
Quit and reopen Safari. Reopen Pixelify and check the engine status badge in Settings (gear icon) to confirm GPU acceleration is active.
Android and iOS
On Android, WebGPU availability tracks both the browser version and the device's GPU driver generation; flagship devices from the last couple of years are broadly supported, and updating both the browser and the system webview resolves most gaps. On iOS and iPadOS, WebGPU support arrived with recent Safari and is inherited by every browser on the platform, since all of them use the same underlying engine. In both ecosystems, the operating system version is usually the lever.
Confirming it actually worked
This step is the one people skip, and it is the one that counts. A flag being enabled does not guarantee a tool can use it: drivers misreport, hardware lacks required features within a generation, and the browser may fall back silently. The only trustworthy confirmation is the tool itself reporting which engine it is running. Reopen the settings panel after enabling everything, and read the badge again. GPU acceleration: done. CPU fallback: something above did not take, and the browser's GPU diagnostics page will name the failing feature.
What to expect after enabling
Realistic expectations: single small images that took five to ten seconds on the CPU path commonly drop to one or two. Large images and batches improve by similar ratios, with the added benefit that the GPU path thermals more gracefully on laptops; the graphics chip is better at sustained math than the CPU fan is at exhausting processor heat. Quality does not change between paths; the same network runs either way. Only the wait changes, and it changes substantially.
Two more things worth knowing
The first is that WebGPU is a shared platform, not a premium feature that this tool owns. Any other local AI project you install on the same machine will start using the same accelerated path you just unlocked, without any of them asking you to configure anything. That interoperability is exactly what makes browser-based AI feel like a platform rather than a collection of isolated apps.
The second is about how to verify progress while you experiment. If you want to confirm the acceleration is real on your own machine rather than trusting a blog post's numbers, run a single image once with the badge on GPU and once with it on CPU, and time the processing stage with your system's profiler. Most users find the difference is large enough to be obvious in the result; those who want exact numbers can get them in thirty seconds, which turns a blog-read into a first-hand measurement.
One last note on why this matters beyond speed. WebGPU is not a proprietary accelerator tied to one service; it is an open, cross-vendor standard that every browser and hardware maker implements. Enabling it once upgrades every local AI tool you use, today and in the future, without any of them asking you to install anything. Two minutes, no downloads, no account, and a switch that moves browser AI from "convenient" to "genuinely fast."